Many of us have time constraints when baking. And when trying to bake multiple loaves at once, we can only fit so many in the oven. One way to space out loaves are to refrigerate the dough for hours or even a day or two to delay proofing. I recommend doing it after the first knead and before allowing it the first proof. I haven't done any experiments with refrigerating the shaped loaf, but I do know that I would rather let the dough proof a little longer on the first rise than after shaping, when things usually go faster and can go wrong much more easily.
If storage space is at a premium, take a gallon ziplock bag and give the inside a good hit with nonstick spray before dropping in your dough and sealing. You can make several loaves in a row this way, and label them on the outside of the bag. To use the dough, just remove from the bag and proof as you normally would, but allow an extra 30-60 minutes for the dough to lose the cold from the fridge.
Wednesday, December 27, 2006
Refrigerated dough...
Monday, December 25, 2006
Loaf #17, challah recipe two with bread flour
 This was my first successful ring loaf (as opposed to Loaf #13), in which I used the second challah recipe but with bread flour instead of all purpose flour. An egg wash and sprinkling of sesame seeds finished it off. It was a much better bread with bread flour, softer, moister and a bit chewier. It lasted for several days without too much deterioration in flavor and texture.
Challah 2.0
2 teaspoons instant yeast
17 oz bread flour
1/4 cup (2 oz) warm water
3 large eggs, plus 1 for glaze
1 1/2 teaspoon salt
1/4 cup vegetable oil
1/4 cup honey or 1/3 cup sugar
sesame seeds
Slurry
Whisk together yest, 1 oz of the flour, and all the warm water until smooth. Let stand uncovered for 10-20 minutes until it begins to ferment and puff up slightly.
Dough
Whisk 3 eggs, salt, oil and honey or sugar into yeast slurry. Stir in remaining flour, knead for no more than 5 minutes.
Proof
Proof for 2 hours, shape and proof for another 2-3 hours until the loaf triples in size.
Mix the remaining egg with a pinch of salt for glazing. Sprinkle with sesame seeds. Bake at 325, 15-20 minutes for rolls, two 15 oz loaves for 25-35 minutes, one 1.5 lb loaf for 35-45 minutes.
Friday, December 22, 2006
Loaf #16, tear apart raisin challah rolls
 Again I played with challah bread and all purpose flour, this time adding raisins to the mix to see if it had any effect on the outcome. I've gotten good enough at dividing the bread dough that I just eyeballed it to cut the dough into 8 pieces and put them into a typical loaf pan.
The addition of raisins didn't make up for the fact that all purpose flour has a drier texture than bread flour, not quite as much flavor. But the loaf pan did make for a nice bundle of rolls, perfect for a family dinner or small gift.
A small note. To keep the raisins from mushing and discoloring the bread as much, I keep them in the freezer until right before I add them to the dough. If you don't mind them blending a bit with the dough and discoloring it, then the raisins can be added at room temperature. If you use blueberries it will turn the dough blue unless they are frozen.
Challah 2.0
2 teaspoons instant yeast
17 oz all purpose flour
1/4 cup (2 oz) warm water
3 large eggs, plus 1 for glaze
1 1/2 teaspoon salt
1/4 cup vegetable oil
1/4 cup honey or 1/3 cup sugar
3 oz raisins (store in freezer)
Slurry
Whisk together yest, 1 oz of the flour, and all the warm water until smooth. Let stand uncovered for 10-20 minutes until it begins to ferment and puff up slightly.
Dough
Whisk 3 eggs, salt, oil and honey or sugar into yeast slurry. Stir in remaining flour and raisins, knead for no more than 5 minutes.
Proof
Proof for 2 hours, shape and proof for another 2-3 hours until the loaf triples in size.
Mix the remaining egg with a pinch of salt for glazing. Bake at 325, 15-20 minutes for rolls, two 15 oz loaves for 25-35 minutes, one 1.5 lb loaf for 35-45 minutes.
Wednesday, December 20, 2006
Time, the baker's best friend/enemy....
Time is among the most important elements in baking. Too much or too little can ruin the simplest recipe (ask my sister about burning water.) There is a basic time rhythm to my bread baking, which is tweaked a bit for specific recipes. Your average loaf of bread won't self destruct in a matter of minutes, but 10 minutes can make the difference both during a proof and certainly during baking.
My typical bread baking goes something like this.
Make a preferment the day before baking.
When starting a loaf, step 1 is to fill the tea kettle and turn it on. I'll need the hot water in about 10 minutes.
Put all dry ingredients in the mixing bowl, add preferment/wet ingredients and turn on the dough hook.
Just bring the dough together, cover with a towel and set the timer for 20 minutes. This lets the flour hydrate, more important with whole wheat flour from what I've read. I skip this with some breads like challah which don't require much kneading or hydrating.
When the timer goes off, remove the towel and start the dough hook back up.
While the bread is mixing/kneading, put a large bowl in the oven and fill with hot water from the kettle. In a few minutes it will create a warm, moist environment that the yeast thrives in.
Take another bowl and spritzed with nonstick spray.
Put kneaded dough into nonstick sprayed bowl, put in the oven with hot water. Set timer for 2 hours.
When the timer goes off, set tea kettle on for a new batch of hot water. The water in the oven may still be warm, but I prefer to keep it going hot for max rise.
Pull out the dough and prep your work surface for shaping. I have a big cutting board that I prefer for this, it makes cleanup easier than using the counter.
Prep your baking dish, whether it's a loaf pan spritzed with nonstick spray or sheet pan with a silicon mat or parchment paper.
Shape your loaf in whatever style rocks your boat.
Place in the pan, put back in the oven.
Dump the old water and replace the hot water in the bowl.
Set time for 1 hour. This can vary a little bit, since some doughs proof faster or slower, but usually an hour is a good time to at least check.
When the timer goes off, if the dough is about ready pull it out and preheat the oven. Learn how long it takes for your oven to preheat and set your timer for a minute or two past that, so you get the loaf in the oven immediately after preheat finishes.
Don't forget to remove the hot water bowl. My hot water bowl is oven safe, just in case I forget.
Glaze the loaf if you are using an egg wash or other crust treatment. This helps keep the loaf from drying out during preheating. If you aren't using a glaze, find a bowl or plastic container big enough to cover the dough so it doesn't crust. I've never had luck with plastic wrap, and I prefer to have something around that I reuse.
When the timer goes off and the oven is preheated, put the loaf in the oven and set your time for the recommended baking time. This is usually between 25-45 minutes, depending on the size and shape of the loaf. A typical loaf pan with 1 1/2 pounds of dough takes about 35 minutes, a French loaf takes closer to 25. Wetter doughs can also take longer than dryer ones.
When the timer goes off, check your loaf with a temp probe, knock on it, or just go on good faith that it's done. Put the pan on a trivet and let it cool for at least 15 minutes before trying to dump out the loaf.
Don't forget to turn off your oven.
Put the loaf on a cooling rack for at least an hour before attempting to cut. Warm loaves aren't done baking, the gluten inside is still solidifying.
Keep the loaf in a plastic bag or sealed bin to keep it fresh. Most bread is only good for a day or two before it gets stale.
Overall, it takes probably 4 hours on average to make a loaf of bread. You can do many things while waiting for it to proof and bake, but always be nearby so you can do the next step in a timely manner.
Monday, December 18, 2006
Loaf #15, tear apart challah rolls
 Again I used all purpose flour like some of the challah bread recipes called for, which didn't do much for the flavor or texture but worked well enough to eat without regret. I wanted to play with the concept of tear apart rolls, so I divided the dough into 10 pieces of equal weight and put them into a 1.5 qt pan coated with nonstick spray. As you can see in the pics, it proofs nicely. After baking and removing from the pan the individual rolls came apart easily.
This is the same dough as used in the previous challah post.
Challah 2.0
2 teaspoons instant yeast
17 oz all purpose flour
1/4 cup (2 oz) warm water
3 large eggs, plus 1 for glaze
1 1/2 teaspoon salt
1/4 cup vegetable oil
1/4 cup honey or 1/3 cup sugar
Slurry
Whisk together yest, 1 oz of the flour, and all the warm water until smooth. Let stand uncovered for 10-20 minutes until it begins to ferment and puff up slightly.
Dough
Whisk 3 eggs, salt, oil and honey or sugar into yeast slurry. Stir in remaining flour, knead for no more than 5 minutes.
Proof
Proof for 2 hours, shape and proof for another 2-3 hours until the loaf triples in size.
Mix the remaining egg with a pinch of salt for glazing. Bake at 325, 15-20 minutes for rolls, two 15 oz loaves for 25-35 minutes, one 1.5 lb loaf for 35-45 minutes.
Friday, December 15, 2006
Loaf #14, Challah Recipe 2
 While looking at this recipe, I realized that many of the challah bread recipes called for all purpose flour instead of bread flour. So for an experiment I tried this new recipe with all purpose flour. I actually did two loaves, one I made into two long pieces, twisted together and twirled into a bowl. The other is a simple braid, although it's better than the first braid I tried in a loaf pan. I think they key is even pressure on the braid, and to make sure there is even pull all over rather than squishing it into the pan so pressure lets part of the dough push up unevenly.
The main difference between this recipe and the previous challah bread recipe is the use of more egg, and it has less flour and water making a smaller loaf. I used sugar rather than honey because that's what I had on hand. This is also adapted from the book "A Blessing of Bread" by Maggie Glezer.
Challah 2.0
2 teaspoons instant yeast
17 oz all purpose flour
1/4 cup (2 oz) warm water
3 large eggs, plus 1 for glaze
1 1/2 teaspoon salt
1/4 cup vegetable oil
1/4 cup honey or 1/3 cup sugar
Slurry
Whisk together yest, 1 oz of the flour, and all the warm water until smooth. Let stand uncovered for 10-20 minutes until it begins to ferment and puff up slightly.
Dough
Whisk 3 eggs, salt, oil and honey or sugar into yeast slurry. Stir in remaining flour, knead for no more than 5 minutes.
Proof
Proof for 2 hours, shape and proof for another 2-3 hours until the loaf triples in size.
Mix the remaining egg with a pinch of salt for glazing. Bake at 325, 15-20 minutes for rolls, two 15 oz loaves for 25-35 minutes, one 1.5 lb loaf for 35-45 minutes.
I found the all purpose flour just didn't give me the same rich taste as the bread flour. My wife referred to it as the "brown and serve roll" flavor, good but not anything special. I prefer the other challah recipe, both for the flavor and the fact that it makes more bread with fewer eggs not that eggs are super expensive but you do go through alot when baking lots of bread.
Wednesday, December 13, 2006
Challah issues...
Twice when I baked a loaf of challah bread with some sort of dried fruit (raisins, dried blueberries, etc) I ended up with an under baked spot somewhere in the middle. My other loaves turned out fine, so I'm assuming that I added too much of the dried fruit. I added a 6 oz package of dried blueberries in this loaf.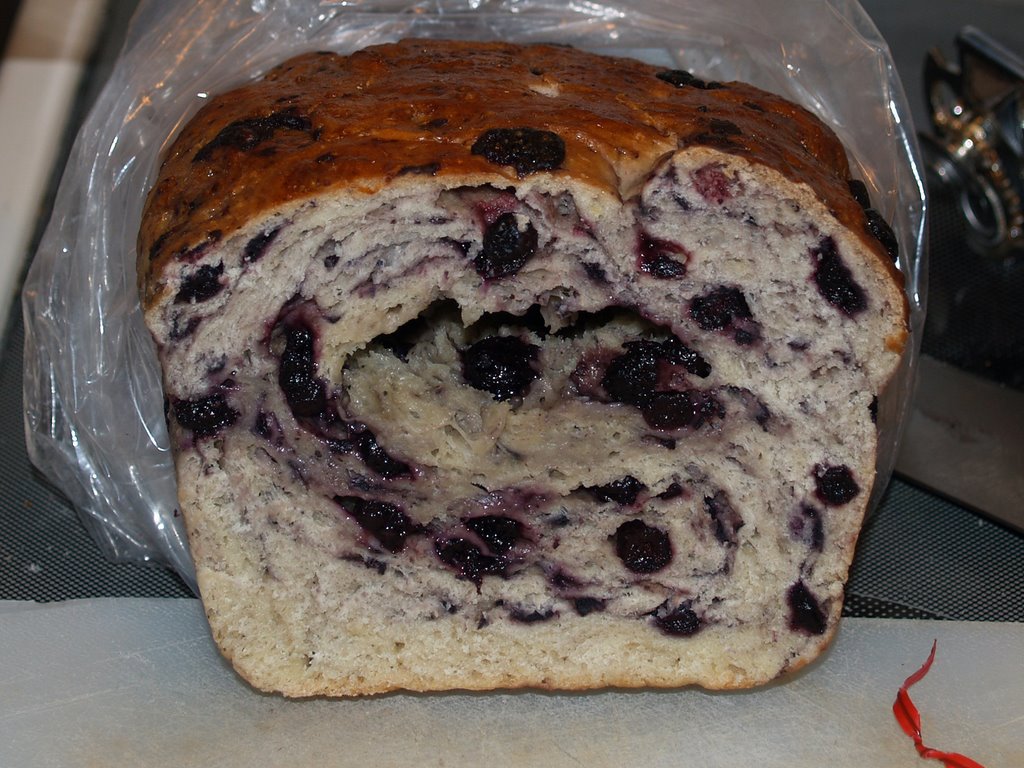 So for the next loaf, I followed the same recipe and only added 2 oz of dried fruit (in this case, golden raisins and cherries). For a bit of a change I did a quick braid with the dough and laid a strip across the top, just to see how it proofs and bakes.
I have to admit, the strip across the top didn't do much for the aesthetics of this loaf, but it baked fine. The loaf turned out much better, but there was still a tiny spot that just wasn't baked quite as well as it should be. So I just upped the cooking time for a full loaf like by 5 minutes to 40 minutes total, and it turned out fine. I don't think the presence of the raisins affected it quite as much as the sheer mass of dough that had to be baked. Smaller loaves or wreaths require less baking because the heat has less to go through.
Monday, December 11, 2006
Loaf #13, almost a good idea.
 Ok, this was an experiment that went right in some ways and horribly wrong in others.
I started with the basic bread recipe. The preferment was 8oz of high gluten bread flour which usually gives the loaf a nice lift and soft texture. The rest of the loaf had 4 oz high gluten flour, 2 oz teff flour, 2 tablespoons flax meal, and the rest was about 10 ounces of whole wheat flour. It proofed nicely and was perfect for forming a freestanding loaf, but I decided to try and make a ring loaf. This involves making a boule, punch a hole in the middle and form it into a ring. What I ended up doing was taking away any structural support that would have turned this into a high proofing loaf.  As you see in the cross section it ended up going outwards rather than upwards. The texture is still good, soft but slightly mealy with the addition of the flax meal and teff flour, and a slightly nutty taste. It makes a great bread to serve with soup, especially for dipping. Again I'll try this recipe variation again, but won't mess with the ring form until I have a clue what I'm doing. I prefer my loaves to move upwards rather than outwards most of the time.
Friday, December 08, 2006
Loaf #12, half whole wheat

This time around I made the loaf with half whole wheat and half high gluten flour. Again I followed the basic bread recipe, the preferment was 8 oz of high gluten flour, and for the rest I used 12 oz whole wheat and 4 oz high gluten. I didn't bother with a glaze on this one, but I did try a simple knot that didn't work out quite like I intended. It looks good and tasted great, but was a bit lopsided. The high gluten flour gave the loaf a wonderful lift so it wasn't the paving stones that the whole wheat loaf turned out to be. I have heard that additional gluten can make even a whole wheat loaf into a soft bread, but that's an experiment for another time.
After proofing and shaping I put the dough into a 1.5 qt round Pyrex dish, then baked it for the usual 35 minutes. The taste was the usual good basic bread taste except with the more earthy flavor from the whole wheat.
The cross section shows an excellent crumb (texture) throughout the entire loaf. I love eating huge slabs of bread with a little olive oil spread and jelly. I do plan to do more with this recipe later, mostly adding other types of flour along with the wheat as about half of the dry goods content. When I'm out of flour I'll be adding gluten to see how that works with the dough.
Thursday, December 07, 2006
Loaf #11, whole wheat bread....
 I used the basic bread recipe except I used only whole wheat flour. This makes a wonderfully smelling but very heavy loaf. When I mean heavy, I mean slice it fresh then use the pieces to pave your driveway. Why did I do this loaf, knowing that it would turn out this way? So I could blog it, and compare it to mixtures involving wheat and regular bread flour.
It did have a nice taste, but the texture was just too dense and crumbly to fully enjoy in my opinion. I like a chewy bread.
But now that loaf is done, and I will have a follow up with other loaves using whole wheat flour but not for the entire loaf. I may also play around with added gluten to see if I can soften it up and make a whole wheat loaf with a good rise and soft texture. Overall, it came out as expected, and I didn't really expect to like it. After a day or two I cut it into cubes and tossed it out for the birds and squirrels, which I haven't seen eating it yet. Maybe they aren't fond of dense whole wheat either.
Friday, December 01, 2006
yeast storage...
Some folk might not be familiar with instant yeast. In short, it's a yeast that is usually mixed with the dry ingredients, doesn't need proofing and can be stored in the freezer for at least a year after opening (mine was still good when I ran out after 18 months). Instant yeast usually comes in vacuum packed packages in 1 pound increments. I get mine from Sam's Club, but you can order it from other places online. The advantage to instant yeast is that you don't have to proof the yeast, it blends well with the dry ingredients so it mixes in easily, and its long storage life. Most bread recipes only require 1 teaspoon of instant yeast for a loaf.
After opening the package of instant yeast (which is fine at room temp until opened), I pour the rest into a jar or two that I keep in the freezer. The yeast will go bad if left out, so I make a habit of only pulling out the yeast for when I am about to measure it out, and it never leaves my hand between the freezer and the mixing bowl so that I remember to put it back immediately. Sound paranoid or anal retentive? Maybe it is, but I've forgotten the jar on the counter before and found it the next day.
If you only bake once in a great while, then the little packets of active dry yeast may work better for you. I bake a half dozen loaves a month at least, so a pound of instant yeast doesn't last more than 8 months in my house at this point.
Putting the date that you opened the package on your bottle of yeast in the freezer is a good idea too, so if it suddenly isn't working, you can say "I bought this back during the Clinton administration, I wonder if that's why it won't work."
Be kind to your yeast, and your yeast will be kind to you.